Integrating with Existing iOS Projects
This guide offers a detailed walkthrough on integrating the Parra iOS SDK into an existing app. If you haven't started your project in Xcode yet, we recommend beginning with the quickstart guide. It demonstrates how to use the Parra CLI to automatically generate a new Xcode project with Parra already integrated.
Verify Compatibility
Make sure that your existing project is compatible with Parra. Parra uses modern tools and APIs and has the following requirements:
- Can be built with Xcode 15.4 or newer
- Has a deployment target of iOS 17 or newer
- Uses SwiftUI
Add the Parra SPM Package
First, open your Xcode project to add the Parra SDK via the Swift Package Manager. The URL of the repo hosting the Parra Swift package can be copied below.
https://github.com/parra-inc/parra-mobile-sdks
If you're unfamiliar with adding SPM packages, follow these steps depicted by the screenshots below.
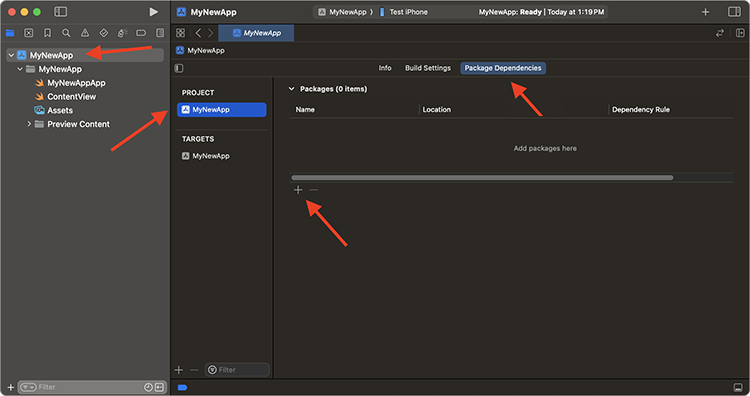
- Select your project in the file navigator on Xcode's left pane.
- In project settings, select your app under the "Project" header. (Not the "Target")
- Select the "Package Dependencies" tab.
- Click the "+" button to open the package search window.
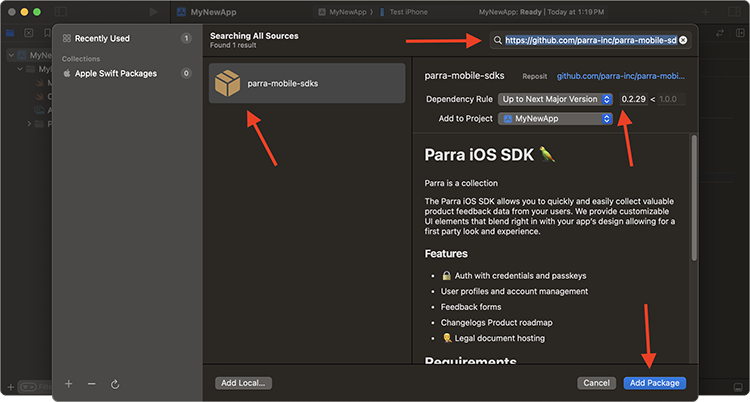
- Paste the URL https://github.com/parra-inc/parra-mobile-sdks into the search field.
- Select the
parra-mobile-sdkspackage from the search results. - Choose a dependency rule. Xcode will select "Up to Next Major Version" by default. Parra strives to only release breaking changes during major releases, but
- Click "Add Package."
Obtain Application and Tenant IDs
Open your workspace in the Parra dashboard. Grab the tenant ID from your workspace settings, and your application ID from your applications list. You'll need these for the next step.
The ParraApp Wrapper
A ParraApp is a wrapper around you're app's content that lives at the entry point of the app. Locate your @main directive and incorporate Parra by adding a UIApplicationDelegateAdaptor and inserting the ParraApp struct into your Scene. Provide tenant and application IDs you found in the previous step to the ParraApp initializer.
import Parra
import SwiftUI

@main
struct MyNewApp: App {
    @UIApplicationDelegateAdaptor(ParraAppDelegate<ParraSceneDelegate>.self) var appDelegate

    var body: some Scene {
        ParraApp(tenantId: <#TENANT_ID#>, applicationId: <#APPLICATION_ID#>, appDelegate: appDelegate) {
            WindowGroup {
                ParraOptionalAuthWindow {
                    ContentView()
                }
            }
        }
    }
}
If your app is using a custom App Delegate or Scene Delegate, check out our configuration doc for examples of how they can be used with ParraApp.
Project Configuration & Entitlements
The configuration changes described here are necessary for specific functionality. If your app doesn't require certain features, you can omit the corresponding configurations.
Info.plist
- NSCameraUsageDescription: Required to allow users to take new profile pictures.
Recommended Value
We use your camera to take profile pictures and support other user-controlled actions.
Entitlements
- aps-environment: (String) Required for push notification functionality. This includes both user-facing notifications and silent notifications that refresh state in-app.
- The value should be
developmentin DEBUG builds andproductionin production or TestFlight builds.
- The value should be
- com.apple.developer.associated-domains: (String array) Required for passkey login, and QuickType suggestions for usernames and passwords. Each entry should have the prefix
webcredential:and coorespond to the domains configured for your workspace. It is recommended that you include the optional query param?mode=developerin DEBUG mode. It should not be present in production or TestFlight builds.Example Associated Domains
<key>com.apple.developer.associated-domains</key>
<array>
    <string>webcredentials:parra-demo.com?mode=developer</string>
    <string>webcredentials:parra-public-demo.parra.io?mode=developer</string>
    <string>webcredentials:tenant-a1b2c3d4-e5f6-a7b8-c9d0-e1f2a3b4c5d6.parra.io?mode=developer</string>
</array>
What's Next?
Now that the Parra SDK has been added to your project, you may want to check out: